Wireframing is an important step in any screen design process. It allows you to define the information hierarchy of your design, helping you plan how you want your user to process the information.
Wireframing is a vital component of the screen design process. It enables you to establish the information hierarchy of your design, facilitating the planning of layout in accordance with how you want users to perceive information. If you haven’t tried wireframing yet, it’s a great opportunity to dive in and give it a shot.
What Is a Wireframe?
Just like an architectural blueprint, a website wireframe provides a two-dimensional black and white representation that helps you understand the structure of the final product. This is also essential for screen designs, as you can’t begin building components or writing code without first determining the layout and placement of information.
At a deeper level, wireframes are valuable in understanding user interactions with the interface. They can depict different button and menu behaviors.
Wireframing is crucial as it enables the designer to strategize the structure and functionality of an interface without being influenced by aesthetic elements such as colors, fonts, or text. In my experience, I often highlight to clients that if a user cannot navigate a black and white wireframe, the color scheme becomes irrelevant. The placement of a button must be clear, regardless of its visual appearance.
Similar to the base of a structure, it must possess a solid foundation before considering investing in a costly layer of paint.
How to Create a Wireframe
Incorporate these steps and suggestions to implement wireframing into your personal design approach.
The first step is to find inspiration.
With visuals, I ♥ wireframes shows you how designers approach their wireframing process. Take a look and gain a comprehensive understanding in no time.

You may want to consider using Wirify, a convenient browser bookmarklet that allows you to view a “wireframe-d” rendition of any active website.
Visit CNN’s website and utilize Wirify for a unique experience.
As you consistently study the approaches of other designers and websites in creating wireframes, a clear understanding of how these tools assist in organizing screen information will gradually form in your mind.
Step 2: Designing Your Process
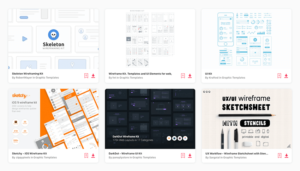
Design is an ever-evolving journey, and as such, every designer has their own unique approach to wireframing and bringing it to life through visuals or code. The key is to discover the process that best showcases your strengths and aligns with your personal style. Refer to the diagram below for examples of common processes.
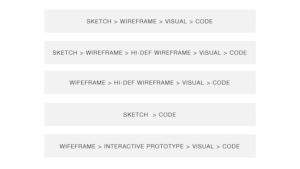
Airbnb is renowned for promoting the utilization of sketches and immediate coding, emphasizing the significance of wireframing and efficiency in their methods.
Having experienced multiple design-to-code cycles, I have come to appreciate a more efficient approach.
As an illustration, I used to construct numerous websites using Blueprint. As a result, I would align my wireframes and Blueprint to a 12-column grid. This significantly accelerates the process of prototyping and development, eliminating the need for me to manually specify each element’s width in the CSS stylesheet. Furthermore, I have utilized cssgrid for its ability to create responsive designs. However, various CSS/HTML frameworks (such as Bootstrap, Tailwind CSS, or Foundation) can serve as a starting point fo

As mentioned previously, the decision of which process to use is ultimately in your hands. It may take some trial and error to determine which method works best for you. While some individuals excel at sketching and may opt not to use a wireframing tool at all, others may prefer a more structured approach to minimize divergences and thoughtfully consider each iteration as the design comes together.
As you continue, you will establish your own preferred method. However, for the purposes of this tutorial, I will demonstrate my typical approach.
I generally turn to Illustrator as my wireframing tool for three main reasons
- Similar to CSS, type and object styles can be saved and applied throughout. This allows for easy re-use within your project.
- Modifying, moving, or scaling multiple objects is a simple task.
- It offers a smooth transition to alternative software in the future.
With that being said, Figma has become the preferred choice for wireframing over Illustrator. Not only does it encompass all of the aforementioned features, but it also offers collaboration options and interaction design capabilities for prototyping, eliminating the need for a separate visual stage. Of course, I do utilize other tools depending on the specific project at hand. In the following section, I will provide a brief overview of some widely used tools, highlighting their strengths and weaknesses.
Step 3: Pick Your Tools
Here are a few well-known tools, listed in no specific order (and let’s not overlook the classic pen and paper!).
Balsamiq
Balsamiq gained popularity due to its sketch-like wireframes, clearly indicating that they are not finalized but rather a work in progress. Additionally, the software offers a vast collection of drag-and-drop reusable components for effortless wireframe designing.
Additionally, Balsamiq can be utilized on a variety of platforms. Desktop options are compatible with Mac, Windows, and Linux systems, while a web version is also available for those who prefer working in the cloud. Furthermore, third party applications like iMockups for iOS offer support for exporting Balsamiq formats.
Omnigraffle
Omnigraffle, a beloved Mac program, also boasts a well-established collection of user-contributed reusable components known as Graffletopia.
As a specialized diagramming application, Omnigraffle offers an array of advanced tools such as automatic layout, customizable object styles, intelligent guides, and graph capabilities. While similar features can be found in Adobe CS suite, those without access to the suite can still benefit from Omnigraffle’s affordable price of approximately $100 for creating intricate wireframes.
Axure
Axure, often referred to as the pioneer of wireframing tools, was among the first high-quality options for wireframing and prototyping. While it used to exclusively cater to Windows users, that has changed in recent times. While I haven’t used it extensively myself, it is highly regarded among experts in the field and widely employed by industry professionals.
Mockplus
Discover Mockplus, the ultimate solution for all your product design needs in today’s world. This comprehensive platform provides RP for prototyping, iDoc for collaboration, and DS for design systems. Jumpstart your journey with a free trial and select the plan that best fits your requirements – whether it’s individual, team, or enterprise.
Figma
In recent years, Figma has made a big impact in the design tool industry. Its focus on web and UI designers makes it a perfect choice for wireframing. Additionally, its browser-based platform makes it a convenient option for collaborative work.

Figma offers an exceptionally user-friendly experience for wireframing. And if you ever need assistance, it also provides a pre-made wireframe template to get you started.
GoMockingBird
GoMockingBird, similar to Figma, is an internet-based tool for creating wireframes. It fosters collaboration by allowing you to simply design, drag and drop components, and easily share the link with your colleagues or clients to work together on the same wireframe.
InVision Freehand
InVision, a longstanding favorite in the design industry, is known for its dependable collaboration capabilities. Its team has also developed InVision Freehand, a distinct product that provides a digital platform for collaborative whiteboarding. Similar to the benefits of using pen and paper for wireframing, this tool allows you to sketch, doodle, annotate, edit, erase, and iterate on your ideas.
Flairbuilder
Flairbuilder is a dynamic and versatile tool that streamlines the process of creating mockups for websites and applications.
Additionally, the platform offers a vast selection of components to choose from, allows for the use of master pages, and has the ability to export prototypes for online viewing.
Other Online Applications
For those who are not fond of desktop software, there are alternatives such as mockflow and hotgloo that may be worth considering.
Keynote/Powerpoint
With Keynotopia, enhance your preferred presentation software into an unparalleled rapid prototyping solution for designing mobile, web and desktop app mockups. And don’t worry if you’re not a Mac user – we’ve got powerpoint templates available too.
Personally, I highly suggest it for quick wireframing or prototyping of mobile apps.
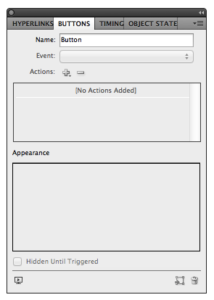
Adobe XD
For those already well-versed in the Adobe suite, Illustrator and InDesign offer powerful wireframing capabilities, each with their own unique advantages and disadvantages. However, XD has emerged in recent years as the top choice for UI design within Adobe’s suite.
For those already well-versed in the Adobe suite, Illustrator and InDesign offer powerful wireframing capabilities, each with their own unique advantages and disadvantages. However, XD has emerged in recent years as the top choice for UI design within Adobe’s suite.
Adobe Illustrator
While not the most powerful wireframing tool from Adobe currently, Illustrator remains a top choice for me. As I am well-acquainted with its features, I’m sure many other designers here are as well. When creating intricate wireframes without interactivity, I turn to Illustrator for its efficient and quick capabilities.
Adobe InDesign
Illustrator boasts a wide range of strengths, including powerful typographic controls and robust support for master pages. Additionally, it now offers the exciting feature of creating interactive prototypes.
InDesign is my go-to choice for crafting interactive, high-quality prototypes with multiple pages.
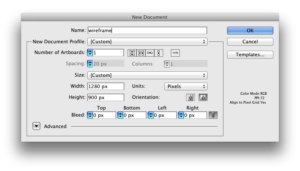
Step 4: Setting a Grid
There is much theoretical discussion surrounding grid systems. However, to summarize, they can be thought of as a systematic and uncomplicated approach for organizing design elements.
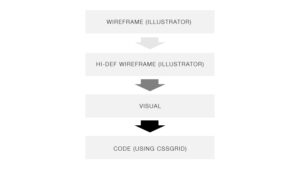
In this tutorial, I will be demonstrating the use of Illustrator. However, the steps can be applied to any tool you choose to use.
To begin, establish a document size. Personally, I opted for 1280 x 900 since I plan to incorporate cssgrid, which enables my website to smoothly adjust from smaller mobile resolutions up to a maximum of 1140 pixels.
Insert the cssgrid template you downloaded into your document.

There is a wide range of grid templates that can be downloaded, but for those wanting to personalize their own, responsify.it is worth checking out.
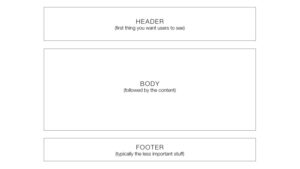
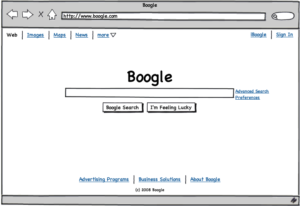
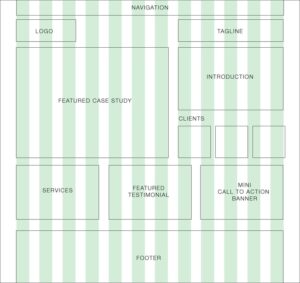
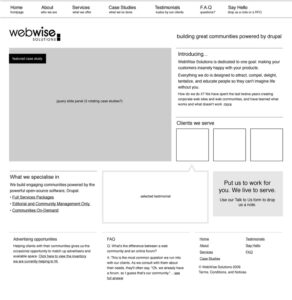
Step 5: Determine Layout With Boxes
To begin, create boxes on the grid and consider the flow of information you want to convey to your visitors. The most straightforward way is top-down, followed by left-right. Here’s an example wireframe with a layout often seen in software companies nowadays:

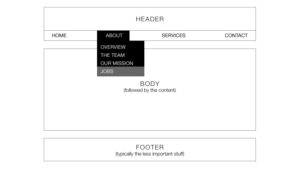
In certain situations, one may have the opportunity to be inventive with the design layout while considering both their purpose and the target audience. This case study showcases a client of mine for whom I was able to deviate from traditional technology company website designs.
This blog layout includes strategically placed advertising containers and detailed guidelines for the client.

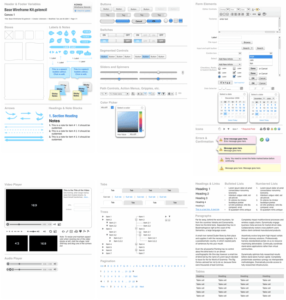
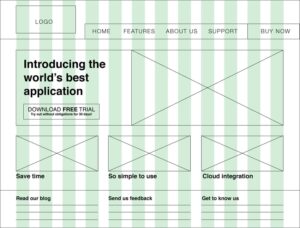
Step 6: Define Information Hierarchy With Typography
Once you have finalized the layout of the boxes, begin incorporating your content to evaluate its organization. As a general guideline, ensure that the information you are presenting is easily understandable, even in a basic wireframe.
Using various font sizes is an effective way to distinguish between varying levels of information.
Don’t hesitate to try out new ideas during this stage. As you add more details, you may discover that the initial layout is not as effective. This is precisely why wireframing is important – it allows for multiple iterations to determine the most optimal way of presenting your information.
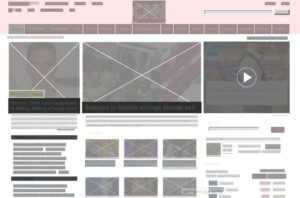
In the following example, I have chosen to enhance the impact of the screenshots and incorporate black boxes to highlight areas of visual significance on this website.
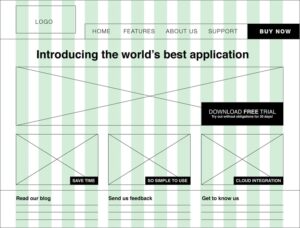
Step 7: Fine-tuning With Grayscale
Employing the entire range of grayscale can assist in gauging the impact of your elements without the need for selecting a color scheme. This approach may prove beneficial in your visual design endeavors down the line.

Step 8: Hi-definition Wireframe
Although not necessary, for those who prefer to proceed gradually, it may be worth attempting. Enhancing a wireframe to high definition involves incorporating additional elements, without delving too deeply into the visual aspects. This could entail inputting the actual text into the wireframe and determining the optimal font sizes.
Another element that could be incorporated is the use of various shades.

The overall concept is that during the visual/code stage, the focus should be on polishing rather than drafting or experimenting. To accomplish this, it is best to utilize a wireframing application that allows for quick iteration cycles between feedback and wireframing, rather than making manual adjustments in photoshop.
In some cases, it may be preferable to skip excessive definition and jump right into interactive prototyping. The rationale behind this is that certain interactive elements cannot be fully conveyed through a static image.
When collaborating with developers, it can be helpful to pass on the approved wireframes for them to code the basic framework, allowing you to focus on the visual aspect of the project.
Step 9: Translating a Wireframe into a Visual
As previously mentioned, I lean towards using Illustrator for wireframing due to its versatility in exporting options. It allows me to generate various file formats such as PDFs, static JPGs, and even transfer it into Figma for incorporating prototype elements.
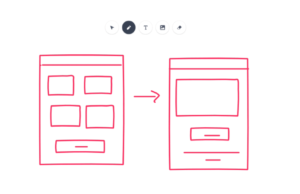
Here is an instance of a wireframe transformed into a visual representation. The basic structure of the wireframe remains unchanged, although some adjustments have been made in its visual presentation.

Wireframing UI Kits From Envato
Get your wireframing UI kits from Envato Elements and let them do the heavy work for you. With a single low monthly subscription, you can access unlimited kits (regardless of your preferred design tool) and other items.
Go Forth and Wireframe!
So here we end this tutorial. I hope it’s inspired you to start experimenting! As with any design process, do not be afraid to iterate, iterate and iterate.
Also, do spend some time experimenting with different tools and processes. You’ll find the time investment worth it once you find an application that feels intuitive to you.