

Free Premiere Pro Course for beginners
Course Introduction and Overview
At the moment, Premiere Pro is considered to be one of the best video editing applications, however its quite difficult for a new user. So in this quick beginners guide for starting with the Premiere Pro Effect program, i will bring you up to speed so that it’s easier for you to operate this program and create professional edits that are different.
We will first go through the more mechanical aspects of this application, and then get into the more creative ones, to help you become a proficient video editor.
“Editing a video can be frustrating, especially for a fresh new user but the end product is always satisfying, don’t be worried i am here to help if you are confused.”
Premiere Pro Getting Started Guide
This is the moment you have painstakingly waited for and prepared for, we are about to launch Actually in this segment, we are going to launch the application and in order to streamline the things, we are going to give a brief overview of the layout, the various sections, and everything related to navigation in the interface.
Currently, I am using Adobe Premiere Pro in its 2025 version. If you, however, have a different program version, your interface will be slightly different but regardless, 99% of the course will be useful in relevance to all recent versions.
Premiere Pro Interface Overview
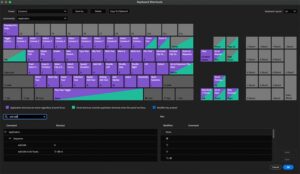
Workspaces are one of the essential functionalities of the Premiere Pro interface. In order to view some of the pre-configured workspaces that are available in your system, click on the button seen at the top of the menu in the image below this text.
If you would rather have the Workspaces toolbar show every workspace you have, you can click Show Workspace Tabs, or if you just want to show the workspace you are currently using, click Show Workspaces Label instead. All workspaces can also be hidden by clicking Show Workspaces Label again, and only the button will be visible.
The setting up of workspaces in the workspace tabs is also simplified with the addition of ‘Edit Workspaces’ where you are able to drag and drop workspaces. Save settings such as the order of how you prefer them, and if you ever want to reset those to how they were originally by clicking Window > Workspace > Reset to Saved Layout.
In the course, we will zoom in on five specific workspaces: Assembly, Editing, Captions, Graphics, and Color. First of all, we will change to Editing mode so that we can look at the video tools available to you in this mode.
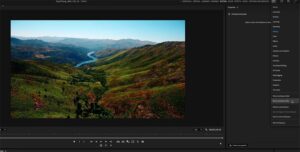
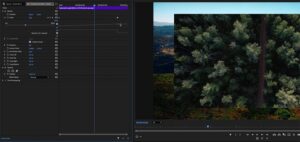
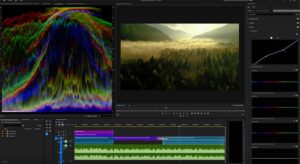
The source monitor is simply a representation of some media contained in your project panel that is not included in the edit you are currently engaged in and is simply a draft area. In the midsection of the screens in editing, there’s what is referred to as a program monitor which displays the material being worked on and to the left, several panels including Source monitor and Effects control panel. The Source monitor displays the footage of the sunset in this case which you have not edited.
The Source Monitor can be used to view the clips for the purpose of locating the aspects of the clips that you would like to include in your edit and add them to the sequence of your choice.
You may have noticed tabs in this area and the most notable one is the Effects tab which is very likely to be clicked often. Drag that over to the left, behind your Project panel, where all of your files reside, to easily access it.
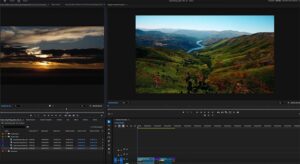
Moving on we have our sequence window next to the Tools panel which has the vertical list of icons, which has some previously inserted which are audio and video clips which our Program Monitor displays.
On the top right corner we have the Properties panel and, below the Program Monitor, there are some quick buttons which allow you to do a variety of simple tasks and these buttons will be explained in detail throughout the course.
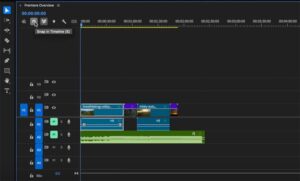
Another button I want to show you is the magnet icon, which is our snapping tool—the keyboard shortcut for this is S. This allows objects to attach to one another when being shifted around in our sequence.
Snapping is best used 90% of the time and turned off when more precise manipulations are needed such as during sound mixing or in the case of video edits with voice overs.
Aside from this, we have the link selection button. With that one checked, this means that any linked clips whether audio to video and vice versa or other clips linked will be moved together when any one of them is selected for moving. You may select the less than symbol (video) to pull it from the audio that is linked to it. When it is left unchecked, those linked clips are able to be moved one by one.
In collaboration with Envato, this course is delivered to you by them, an unlimited subscription service for creative individuals. All you need to create exceptional videos are the widest variety of niches. So don’t wait and follow the link down below and start creating.
Starting with the Premier Pro Video Editing Course
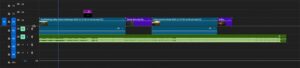
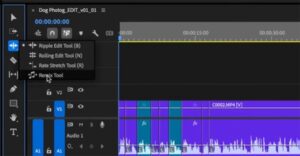
Let us begin to rearrange various elements within our sequence, as done in the picture below, where I have selected the V – Selection Tool to reposition the playhead to display several aspects of the clip on the Program Monitor. The playhead can also be used to grab clips on your timeline, which is nearly everything you would do with the app; it is basically your mouse or cursor.
Choose single video clips with a single click, choose video clips with a click and drag to cover video clips you wish to select and then click and drag along the sequence to move them. This is great if you have a lot of video clips to shift.
On the playhead, a single click will put your playhead in that place and show the appropriate clip in the program monitor. A click and drag will allow you to scrub in your timeline. You may wish to zoom into your sequence on your keyboard using the plus and minus keys, or option and mouse scroll in and out. For even more precise adjustments, use these keyboard combinations: For even more precise movements: Left and right arrow keys: A single Move a single frame left or right respectively. Hold Shift and hit those keys to make a five frame jump. Spacebar Press to play and pause the footage.
- Left and right arrow keys: move a frame in either direction.
- Hold Shift and hit those keys: a five-frame jump.
- Spacebar: play and pause your footage.
- L: speed up your playback in the forward direction
- J: play back in reverse. If you press J or L multiple times, it will increase the speed in either direction.
L make the playback go faster in the mov in that direction. J Rewind repeatedly by pressing J or L it will go faster and faster in that direction
Maksym shares, the next one is the Razor Tool (C), which makes the necessary cuts on a clip upon being clicked with the clip tool selected. In the event that you click the parts you would like to have cut and then select the delete option, the selected portion of the clip will be deleted. Upon doing this, you have the option of shifting the clip else on your timeline.
A ripple is created any time you go about cutting and deleting a clip, more so if the rest of the clips aren’t moved. Instead of deleting a blank area that lies in between two clips, simply select the area and right-click on Ripple, then delete the area, this will delete the ripple. However, if you wish to delete a clip on the gap without closing it, simply press Option-Backspace.
Additionally, this tool allows you to configure textual layers for the duration of the sequence, which can be managed through either the Properties panel or the Effects Controls panel. This tool is incredibly useful, as it coupled with the wrench tool allows you to design a small box and insert information, for making the clips on the sequence more informative.
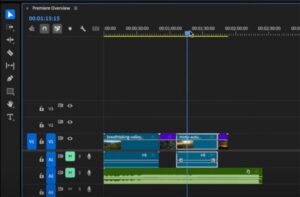
Premiere Pro works in a layer fashion so what will appear above in the video layers will have precedence over what is below. Also, keep in mind that the audiovisual parts are divided in the sequence. Everything that is above the middle horizontal line is the video and anything below the line is the audio.
To modify a clip, simply select it and the Effects Controls panel will provide you with a variety of tools. Position, scale, opacity, and crop tools will be the most frequently used ones. As an illustration, you need to make a clip smaller; change the Scale value in this panel and watch the scaling change take place in real time on the Program Monitor.
You will see small clock like icons with all of these tools. These are the tools that will enable the use of keyframes to achieve basic animations. So anything that has this icon next to it can be keyframed. For example, use the little clock to the side of Scale to animate the clip to a new shape. You’re rotating the Scale parameter to 50 at the beginning of the animation, there’s still another keyframe at the end of the animation, but this time the Scale is 100. The clip will increase in size lightly.
Whenever we start, we create linear keyframes which is a situation where the move happens at a constant speed and velocity over a indicated period of time. If we want to make an animation a little bit different, however, we can use eased keyframes. One quick and easy way to do this is to select these keyframes and right-click > Ease In. So as you can see, now we don’t have a straight line but a curve.
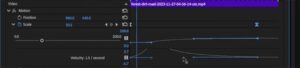
Playing that back, we can see the animation is a little more dynamic.
At this point let’s switch to audio tools. In general, we work in the Editing workspace, however if you want to work more thoroughly, you can go to the Audio workspace any time you want.
The audio tool that commands the most attention is the Editing’s Audio Gain or clip loudness which there are a couple of simple ways to adjust it. The first method is to press and drag the small white line located in the audio section. Alternatively, you can just right click and go to Audio Gain to have finer adjustments.

Another task that you might want to complete on a day-to-day basis when editing is increasing or decreasing the speed of your clip. If you select the video clip you want to change, you can right-click and go to Speed/Duration to make changes to either the specific duration or the speed.
Adding effects and transitions to your clips is really simple as well. Just go to the Effects panel, find an effect you want, and drag it onto your clip.
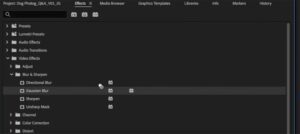
The effects can be adjusted, as mentioned earlier, through the Effects Control Panel.
There is more to be done, so let’s switch our focus on the color panel as of now. The color grading section is where we’ll be heading next. Can a still image offer a more detailed view? Certainly, the essential practicals of this have been outlined here in both the color panel and the lumetri color panel.
Exporting from Premiere Pro
Worry not. You had worked hard on that piece. Just visit the Editing page when you want to export and that’s it. Move your play head to your sequences and press the key I. Then again select the end of your sequences and press O, also this time use your keyboard. This makes it apparent this section is now highlighted.
Now, click on the Export tab. When it comes to internet files. Simply applying the presets works better.Select a high-quality H.264 preset within the sequence settings if you are planning on uploading it.
You only wish to save a master copy of it, select a Prores preset.
After you’re done choosing a destination, hit export, and remember to set your file name. Only use Media Encoder once you have the video finished, exporting it isn’t the time for it.
What we discussed was an overview of all the tools available to you. However, in the upcoming paragraphs, we will get into more depth and work on an edit together.
Setting up a project
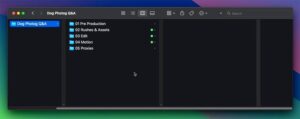
Before we start our project, I want to show you how I set up my hard drive for a project. You can use any folder structure you want, but I find this setup works well.
The key elements are:
- Pre-Production: anything that I’ve been working on prior to the video shoot, e.g. scripts, visual references, color palettes, etc.
- Rushes & Assets: video files from the shoot, plus any other source assets I’ll need for the edit.
- Edit: the Premiere Pro working files.
- Motion: motion graphics files.
- Proxies: proxy media (used for smoother playback of large files during editing)
What are proxies?
Proxies are miniatures created for the larger files that we are working on. In this case, we export the completed files using transcoding to Prores which is an editing codec to ensure the entire editing task_EXPORT process runs smoothly. All the assets are automatically refilled and associated when the files are exported.
“If you have problems working with footage in Premiere Pro, if you’re getting stuttery playback and it’s just doing your head in, a proxy workflow is for you. “
Setting up a new project in Premiere Pro
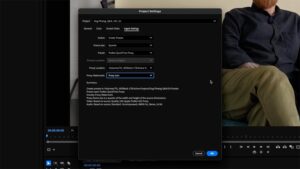
In this section, we will be bringing up Premiere Pro. As you boot it up, this will be the first page you see on its interface. On the screen, it will show recently opened projects which you can choose to continue working on or start fresh. In the top right corner, select the New Project option.
Moving on to the 2025 interface, you will have noticed a prompt which requires you to enter the project title, its location and a preset. Let’s input some quick information to this interface, I will set mine as dogfotog_qa_v01 and then select Edit as the destination from my hard drive. As for the template option, it’s fine to leave it the way it is, simply click on Create.
Importing media
Once you create the new project, you’ll be directed to the Import section where you have access to a variety of sample media by Adobe. You can also see your hard drive on the left side there. You can open the Rushes folder which you probably saw on my Finder. Just select a couple of clips to import.
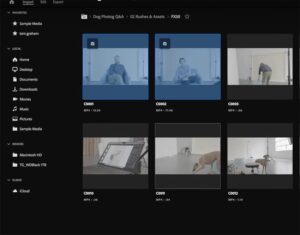
On the right, there are some options available to ensure that your project is started in a neat and efficient way. To do this let’s make a new bin which is what Premiere Pro calls folders and we will name it Rushes.
Moving on to the new option, the second one is to copy media which is important only when you are copying files which are directly from the media inserted in the camera.
Going further down the options the next setting is to create a new sequence, which is present in a timeline view of your project. A sequence is basically your edit put together in chronological order. If the scope of your project grows, multiple sequences can combine to form the final edit. And last, you have the automatic transcription. Now, let us switch this on and select the options given below.
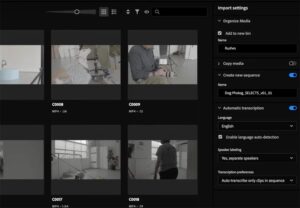
Text-based editing is new to Premiere Pro but it is perfect for this kind of interview-based project.
Let us now go to the editing section that is at the top layer or surface of the video. Please confirm that you are in the Assemble section, and that is located within the upper ribbon of options.
There is the Project panel to your left, and that is just your file explorer and it will show you what’s on the hard drive you’ve been working in a comly manner which I can assume you are. You can see the bin that we made , where our rushes are, and you can see the sequence that you made in this panel is, and this one too has appeared in the Timeline panel in the lower one.
When you later on want to add other media there is really no need to go again to the Import section, you do not need to enter that section every time. You can select the files from the Project panel by right clicking and then choosing the Import menu or preferably you can just drag and drop from Finder into your project bin.
In addition, let’s prepare ourselves with advanced editing features while we create a master sequence. Right-click and go to New Item > Sequence, and select a preset of your choice. I recommend picking the 4K or HD 1080p presets, and after naming your sequence click on OK.
Setting up proxies in Premiere Pro
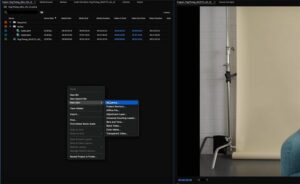
Now, earlier I talked about proxy workflows, so let me run through how to set that up briefly. You go to File > Project Settings > Ingest settings and set the Action to Create Proxies. Here are the settings I recommend. I like to keep the proxy watermark on to make sure that I know that I’m looking at the proxy versus the original while I’m working.
Currently, when you add your footage, the encoder will run in the background and automatically include both the proxy and original files into your project.
You can select such files if you already import your footage into Premiere Pro. Subsequently, when you right click on them and go to Proxy > Create proxies you will get a similar dialog box.
Lastly, after you create the proxies and as you playback your footage the proxy icon will appear on the bottom left corner which should help with the smooth playback.
![]()
Making selects
The next step is to select the footage we want to use in our project. The way I generally like to go about this is to throw most if not all of my rushes onto the timeline and then start sifting through it from there.
In the Source Monitor, for example, one can examine the film clips and then decide on the sequence in which the film time is to be included. Select the portion of the clip that wants to be included and then add it to the rest of your selections in the sequence timeline. This method works too but I personally get annoyed having to go through several screens, it’s much more efficient to have everything in one window. This goes to say that enough time has to go into the editing more especially with transitions, so go with what feels most natural.
I’ve tried to work out an editing style where I can have the comprehensive view of the project and all other aspects of it at one time. A scene like the setting up of the camera, some dialogue, and B roll, I would suggest starting with a tighter focus on storytelling cuts.
Ağırlıklı ses parçaları üzerine çalışıp hikayemizi kuralım. B rollumuzu ilk plan yaptığımızda çıkaralım ana ses unsuru üzerine bu seviyede çalışalım .Mavi bir toplantım var ve bir Parçaların ve konuşmacıların B colorim var ona geldiğimde diğer parçaların konuşan kırmızı ismini kolayca tarif ediyorum. Right click >Label enabled color that you want to change on the selected clip. You can change multiple clips if you want.
“Make sure that you sit down and play through everything before you start making selects. You need to know the content in full before you can craft a story.”
So, whether you were the one who directed and shot this footage or already have a good grasp of it, then yes, you would still be able to handle it, but it pays to watch it all through before cutting it up. Or if you’re simply the editor and didn’t participate in the production at all, then you definitely have to, sit there and watch all your rushes first before making selects.
Text-based editing
Now, with an audio-based edit like this, you can go two ways. You can go old school or new school, and I’ll show you both.
Option 1: Text-based editing
Now, we shall begin with the new school. During my previous description, I stated that text-based editing is available nowadays and because we pressed those buttons while importing the footage, our audio clips have been transcribed automatically and now await us in the text-based editing workspace.
So on the left, the text transcript is visible. You can click anywhere in the transcript and the playhead moves to that particular point in the sequence. In addition to being able to skip around visually, I can also highlight some text, cut parts out of the transcript, and they are cut from the sequence too.
![]()
You now understand how effortless it is to go through the said video and make the selects based on the text. If you know the content you created very well, then it is extremely easy to see in the transcript which sections should remain and which parts are extraneous.
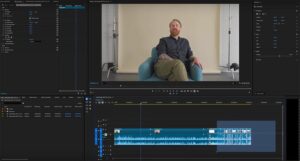
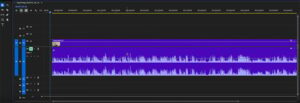
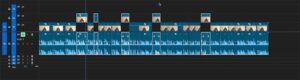
Option 2: Read the waveforms
The traditional approach involves interpreting the waveforms. I will illustrate this using Heather’s video snippets. Since only one individual is addressing the camera, we can examine the configuration of the waveforms and determine that the upticks on the waveform indicate when Heather is reading the script while the lulls and troughs in the waves indicate the other parts or the next sections which are not relevant.
I’ve demonstrated how I go through using the Razor Tool and splitting the cuts ingrained in the non-relevant portions. Naturally my primary focus lands on the cuts, so I’ll give them a brief listen to get the gist of things. After this, I’ll end up erasing those sections to ensure that only the pertinent responses to the camera are kept.
Nevertheless, you can expedite the process by creating a keyboard shortcut. To do this, you must go to the Keyboard Shortcuts under the menu, find Add Edit, and specify what key it should be given to. In the video below, I am using the H key.
To continue with my sequence, if I click anywhere in the blank space above the clips and press H it creates an edit that cuts through any targeted and unlocked tracks, however, this isn’t as effective when there are multiple video layers moving in unison. Click on the empty area above the clips and press H shift and it will create an edit that cuts across any targeted and unlocked tracks.
This edit and cutting procedure is cut and dry when it comes to complex layering and once I apply twt L to increase the speed to twice its normal ratio and click the spacebar when I am ready to move to the next usable section I can easily do this hundreds of times until I formulate a sequence of selections.
That may seem complicated or unintuitive but once you follow along with the key bindings, you are able to cut off the mouse and speed through the editing process, so whether you are on school of old, new or both, then you should be able to achieve what you require.
What I have at the moment is a sequence in which both Dan and Heather’s pieces to the camera are cut in together. I am supposed to watch all of them and determine the best one. Some might have a better performance than the others or some are interested in audio or lighting issues. Others are simply going to suit your taste better. At this point, it’s time to make the pinestimations of the human brain as well as sensibly explain those choices.
I would rather take the more straightforward approach of moving the most choose ones to the V2 track so that when all are selected I would know the easier way to highlight them over the edit sequence.
Make sure you copy them out of your select sequence rather than cutting and pasting them. That way, if you ever need to go back and refer to your select sequence, you can easily find the clips you want.
Creating an edit
As you can see, when I pull these selects over into the edit sequence, I have a bunch of gaps or ripples.
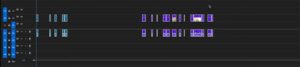
To get rid of ripples, simply highlight all the clips and go to Sequence > Close Gap.
Now, if you’re interested in seeing my thought process play out in a step-by-step fashion when it comes to making creative decisions in an edit, you should definitely check out my beginner’s guide to video editing.
In that course, I take a really methodical approach to crafting a similar piece of work to this project, and I explain my thought process pretty much with every cut. So if you really want to get into the weeds, check that video out next.
For this quicker guide, though, we’re going to skip my creative musings. So I’ve pulled all of those best takes into my edit sequence, and I’ve arranged them in the order that works best for me. You can see that I’ve cut back and forward between Dan and Heather, and I’ve left some placeholder gaps for titles.
I’ve also employed the punch-in technique on a number of shots where we had some jump cuts.
A jump cut is not inherently a bad thing, and sometimes people like to use them. However, it’s not always desirable. One way to get around that is by punching in on your footage. You can do this when you have, for instance, a 4K video and you’re editing and delivering in a 1080p sequence. You can effectively zoom in on your footage by 50% without any discernible quality loss.
Finding and using music in your edit
Adding some good background music can help us make the jump from rushes to a more coherent edit. There’s a great new way to go about this by using the Envato extension for Premiere Pro. It’s available in the Adobe Creative Cloud app, and you can just search for Envato in the app section or click the link below:
To begin, select Window > Extension > Envato . Once the extension is activated, you may turn on the AI-enabled search to obtain music, sound effects, and stock images that correspond to the active frame of your program Monitor.
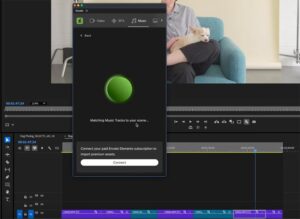
Alternatively, we may commence with a basic search, something we will carry out for some music now. In case you are linked with your Envato account, you can either get a preview of the files or download and license one in full from within the app.
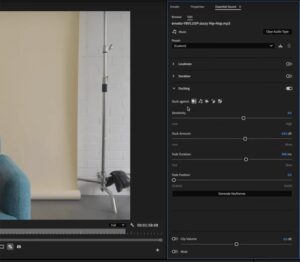
Now, let’s put some hip-hop jazz in there. I’m also going to drop the Gain down to something around -25 dB, which I generally try to start with when setting the level for a music bed. From there, you can adjust the level of the speech to fit comfortably over the music.
This Step can get you more Effects and Mixing than required while working on your audio project in the Audio Workspace. The Edit workspace does however offer some basic tools that help as well. In the top left corner, select Window > Essential Sound if it isn’t already open. We are going to put a ducker on the music so that it goes under our speech.
So with the music track highlighted, I want you to tag it as music in the Essential Sound panel and do not activate any of the settings except the Ducking feature. Using that part, you can set the parameters to suit the music which goes with the speech.
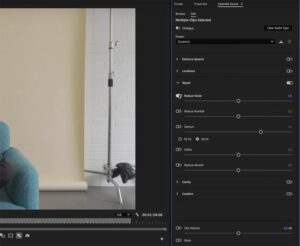
For the time being, I am quite satisfied with the discussion, however, let’s assume that you were in a somewhat loud setting and you wanted to eliminate some of the surrounding noise. Reduced noise can be done in the Essential Sound tab by selecting your audio clips, marking them as a dialog (if not already done), and in the Repair menu additionally activating the Reduce Noise slider.
Remix Your Music is another powerful tool which is not too complicated and requires minimal effort. If the audio length of your music track exceeds the audio length of your video, worry not, kindly make use of this tool. It works by extending or compressing the beats of the audio segment.
Color correction and grading
The 2025 Edition of Premiere Pro has also introduced a new feature that makes color correction far more user-friendly. Simply select ‘Enable Automatic Color Management’ in your Color Settings after checking the Lumetri Color tab and ensure that the Auto Detect Log Video Color Space option is enabled.
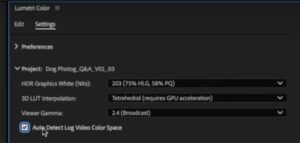
This is going to take our raw footage and broadcast it into rec 709 which is the suitable color for 99% of projects. It’s doing a lot of fundamental color correction on its own. But I’m still required to do a color grade.
Let us now return to the Edit section of the Lumetri Color where we are now able to adjust further on the correction we did and then apply the creative grade. So what I’m going to do is take the eye dropper tool and clicking on the whitest part of the image and check the color balance. Another thing that I do appreciate is to click the Auto function in Premiere Pro which was great for our starting point for what we are about to work on.
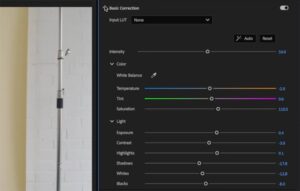
Now let’s give it a quick creative grade. Open up the Creative section, and you can import a creative look or a LUT. And that’s a great opportunity here to try out some of the great LUTs on offer on Envato.
I’m going to choose some retro film LUTs, and I’ll apply one called Palm Springs no 4. Now, the good thing about the creative section here in Lumetri is that we can adjust the intensity of our look. So I’m going to bring it down a bit and then play with the Vibrance slider to bring a bit more punch to the color background as well as the couch.
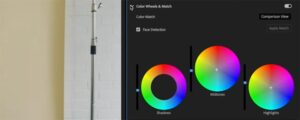
Further, I will amend the color wheel and increase the shadow tint, mid style and highlight luminance levels for introducing some additional image contrast. Besides, I will apply slight vignetting on the image to help focus on the subjects.
You can always toggle each section on and off to check your work, and you can toggle the whole grade on and off globally with the FX button at the top.
So that’s corrected and graded just the one clip on our timeline that we selected, but if we want to apply that to all of our footage, it’s really easy to do. Simply right-click on the clip and select Copy or hit Command-C, and then right-click on the clip or clips that you want to paste the grade to and select Paste Attributes. Just make sure that Lumetri Color is selected in the effects that you want to copy and paste. Simple!
If you’re copying the grade from one clip over to multiple clips, you’ll of course need to go through each clip and make any individual tweaks that will account for things like lighting changes and so on.
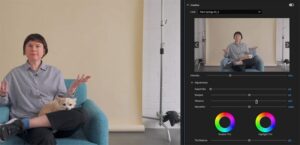
Creating animated titles in Premiere Pro
I’ve made a little intro animation in After Effects, which I’m going to drop in now. But we can add some basic title cards directly in Premiere Pro, where Heather and Dan answer the various questions. I want to keep that same flavor of the opening animation in these titles without having to go back to After Effects.
So first, I’m going to create a space for my titles to sit on. The easiest way to do this is to right-click in the media browser and select New Item > Color Matte. Click OK in the dialog box, and then you’ll be able to select a color. That creates a background, and then we can just add some text on top.

To make it more interesting, let’s add some basic animation, and we can do that here in Premiere Pro. I’m going to have that text pop into place with a bit of easing, and I’ll do that by setting my final position and making a keyframe at the time I want it to land. And then I’ll go back to the start of the clip and pull the position down slightly. I’ll highlight both keyframes and right-click > Temporal Interpolation > Ease Out. Then I’ll grab the handle of the final keyframe and slide it to create a ramp at the end of the movement so it starts slow and then pops up into place quickly.

That looks pretty good, but we can go further with some basic tools. I want the words to pop on one by one. We can do this with the crop function. Setting a keyframe for our crop right at the beginning of this clip, I’ll set Crop to 100%, removing the entire text. I’ll then move to the point I want the first word to pop on and create another keyframe, and I’ll drag the Crop amount until just the first word is showing. Then I’ll repeat the process for each word in turn, so that they appear gradually.

So that’s the text, but it’s still lacking something. Let’s make it more interesting by adding a photo of a dog to reflect the theme of the video. We can use the same techniques to add a simple animation to it, and now we have a professional-looking title card.

Exporting your edit
Our video is completed, and we’re ready to send it to the client for feedback, or maybe it’s 100% finished and we’re ready to upload it to the web. Either way, we need to export our work.
I want to keep this section simple as it can sometimes be a bit complicated. So to start with, let’s make sure that we’re in our Edit workspace and we’ve set our in and out points correctly. To do this, I’m going to go to the front of my sequence and hit I on my keyboard and then go to where I want the video to finish and hit O on my keyboard. That has set out in and out points.
Now we’re ready to go to our Export page, and for the sake of this beginner guide, we’re going to stick to presets. If you’re uploading to the web or just want a manageable copy in terms of filesize, we’ll export a H.264 MP4 file. And if you’re ready to save a master copy for safekeeping, you want to export a Prores copy.
So first, input your file name and location, and select the High Quality 1080p HD preset with H.264 format. You have lots of options you can tweak, but the preset works fine most of the time. At the bottom, make sure that the Range is set to Source In/Out, and then just hit Export.
Next, you can export your master file. Follow the same process, but select the Apple Prores 422 preset with the QuickTime format.
Congratulations, you’re now an editor
So there you go. You now know everything you need to know to get up to speed with Premiere Pro, and you should be able to start making edits of your own.
If you want to continue learning, check out our free Premiere Pro tutorials here on Envato Tuts+. Here are a few to get started with: